July 5, 2026
Reinforcement Learning: Building GridWorld
20 min read
Have you ever wondered how a self-driving car knows when to stop at a red light? Or how a humanoid robot learns to walk? Or how a small robot learns to navigate around obstacles?
All of these problems involve an agent acting inside an environment and learning how to behave over time. The environments are usually very complex, but the core idea is simple: the agent observes the current situation, chooses an action, receives feedback, and adjusts its behavior.
That is where Reinforcement Learning comes in. RL lets agents learn by interacting with an environment and improving from reward signals.
The examples above are far too complex for a first introduction, so RL researchers often use small toy environments to teach the basics. One of the most famous is GridWorld: a tiny world that is easy to understand, but still captures the full RL loop.
In this post, we will build a GridWorld environment from scratch using Gymnasium, and we will mirror the structure of the implementation in this repository. If you want to inspect the full source while reading, the environment lives here: envs/gridworld.py.
Before we look at the code, here is the actual render of the environment we are building. This is the world the agent sees once the episode starts:
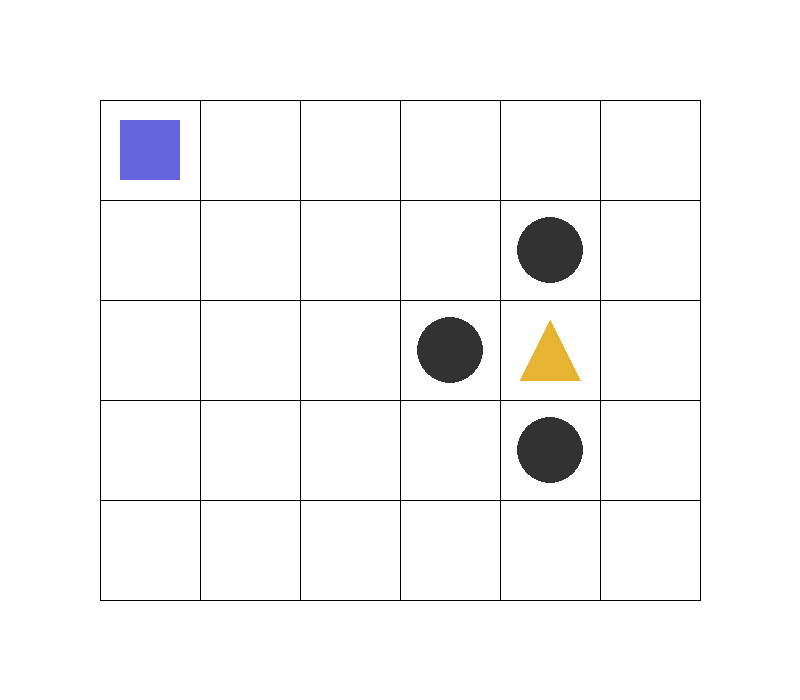
In the Env
- Blue square: the agent
- Gold triangle: the goal state
- Dark circles: trap states
- White cells: normal empty states
What We Are Building
Our GridWorld has a few simple rules:
- the agent starts in the top-left cell,
- one cell is the goal,
- a few cells are traps,
- the agent can move up, right, down, or left,
- reaching the goal gives a positive reward,
- falling into a trap gives a negative reward,
- all other moves give zero reward.
That is enough to create a complete RL environment.
The rest of this post walks through the implementation step by step, so you can see exactly how each piece maps to the code.
Step 1: Import the Required Libraries
We start with the basic imports:
import gymnasium as gym
from gymnasium import spaces
import numpy as np
import pygame
import time
Here is what each library does:
gymnasiumprovides the environment interface,spaceslets us define action and observation spaces,pygamehandles rendering,timeadds a small delay so the animation is readable,numpyis available for numerical work if we need it later.
Step 2: Define the Grid Size and Drawing Constants
Next, we define a few constants that control the visual layout of the world:
CELL_SIZE = 100
MARGIN = 10
Each cell is drawn as a 100 by 100 pixel square. That keeps the grid large enough to see clearly while still staying simple.
Step 3: Convert Grid Coordinates to Screen Coordinates
To render the world nicely, we need a helper that converts a grid position into screen coordinates.
def get_coords(row, col, loc='center'):
    xc = (col + 1.5) * CELL_SIZE
    yc = (row + 1.5) * CELL_SIZE

    if loc == 'center':
        return xc, yc
    elif loc == 'interior_corners':
        half_size = CELL_SIZE // 2 - MARGIN
        xl, xr = xc - half_size, xc + half_size
        yt, yb = yc - half_size, yc + half_size
        return [(xl, yt), (xr, yt), (xr, yb), (xl, yb)]
    elif loc == 'interior_triangle':
        x1, y1 = xc, yc + CELL_SIZE // 3
        x2, y2 = xc + CELL_SIZE // 3, yc - CELL_SIZE // 3
        x3, y3 = xc - CELL_SIZE // 3, yc - CELL_SIZE // 3
        return [(x1, y1), (x2, y2), (x3, y3)]
This helper is purely for rendering. It keeps the drawing code clean and makes it easy to place objects inside a cell.
Step 4: Draw the Objects in the Grid
We also create a small helper for drawing the objects that appear in the world:
def draw_object(screen, coords_list):
    if len(coords_list) == 1:
        pygame.draw.circle(
            screen,
            (50, 50, 50),
            coords_list[0],
            int(0.45 * CELL_SIZE)
        )

    elif len(coords_list) == 3:
        pygame.draw.polygon(
            screen,
            (230, 160, 50),
            coords_list
        )

    elif len(coords_list) > 3:
        pygame.draw.polygon(
            screen,
            (100, 100, 200),
            coords_list
        )
The idea is simple:
- circles can represent traps,
- triangles can represent the goal,
- polygons can represent the agent or other objects.
You could draw everything directly inside render(), but separating the drawing logic makes the environment easier to maintain.
Step 5: Create the Environment Class
Now we define the environment itself.
class GridWorldEnv(gym.Env):
    metadata = {"render_modes": ["human", "rgb_array"], "render_fps": 20}
The metadata tells Gymnasium that this environment supports human rendering and RGB rendering.
The constructor sets up the grid size, a render delay, and the render mode:
def __init__(self, num_rows=5, num_cols=6, delay=0.05, render_mode=None):
    super().__init__()

    self.num_rows = num_rows
    self.num_cols = num_cols
    self.delay = delay
    self.render_mode = render_mode
We will use a 5 by 6 grid, but the implementation is flexible enough to support other sizes too.
Step 6: Define the Action Space
Our agent has four possible actions:
0: up1: right2: down3: left
So the action space is discrete with four values:
self.action_space = spaces.Discrete(4)This is one of the first important ideas in RL: the agent must choose from a finite set of actions.
Step 7: Define the Observation Space
In this environment, the observation is the agent’s current cell.
Instead of using a row-column pair directly, we represent each cell as a single integer state.
For a grid with num_rows * num_cols cells, we define:
self.observation_space = spaces.Discrete(num_rows * num_cols)This makes the environment easy to use with tabular RL methods such as SARSA and Q-learning.
Step 8: Map Grid Cells to State Numbers
We now create a conversion between grid coordinates and integer states.
def _init_states(self):
    self.grid2state = {
        (r, c): r * self.num_cols + c
        for r in range(self.num_rows)
        for c in range(self.num_cols)
    }
    self.state2grid = {v: k for k, v in self.grid2state.items()}
This gives us two useful mappings:
(row, col) -> statestate -> (row, col)
For example, in a 5 by 6 grid:
(0, 0)becomes state0(0, 1)becomes state1(1, 0)becomes state6
This is a compact way to represent the world and is especially useful when training a tabular agent.
Step 9: Define the Movement Rules
The agent should not leave the grid. If it tries to move outside the boundary, it should simply stay in place.
def _init_actions(self):
    self.action_defs = {
        0: lambda r, c: (max(r - 1, 0), c),
        1: lambda r, c: (r, min(c + 1, self.num_cols - 1)),
        2: lambda r, c: (min(r + 1, self.num_rows - 1), c),
        3: lambda r, c: (r, max(c - 1, 0)),
    }
This means:
- moving up from the top row keeps the agent in the same row,
- moving right from the last column keeps the agent in the same column,
- moving down from the bottom row keeps the agent in place,
- moving left from the first column keeps the agent in place.
This boundary behavior is common in GridWorld-style environments.
Step 10: Place the Goal and Trap Cells
Now we define the special terminal states.
def _init_terminals(self):
    self.gold_cell = (self.num_rows // 2, self.num_cols - 2)

    self.trap_cells = [
        (self.gold_cell[0] + 1, self.gold_cell[1]),
        (self.gold_cell[0], self.gold_cell[1] - 1),
        (self.gold_cell[0] - 1, self.gold_cell[1]),
    ]

    self.gold_state = self.grid2state[self.gold_cell]
    self.trap_states = [self.grid2state[c] for c in self.trap_cells]
    self.terminal_states = [self.gold_state] + self.trap_states
In this design:
- the goal is near the right side of the grid,
- three traps surround it,
- reaching any of these cells ends the episode.
That makes the environment small but still interesting, because the agent has to learn not only where to go, but also where not to go.
Step 11: Initialize the Current State
We store the current state as a simple integer:
self.state = 0That means the agent starts in the top-left cell.
We also create placeholders for the rendering window and clock:
self.window = None
self.clock = None
Step 12: Implement reset()
Every Gymnasium environment needs a reset() method.
def reset(self, *, seed=None, options=None):
    super().reset(seed=seed)
    self.state = 0
    if self.render_mode == "human":
        self.render()
    return self.state, {}
When the environment resets:
- the agent goes back to the starting cell,
- rendering is triggered if human mode is enabled,
- the initial state is returned along with an empty info dictionary.
This is what the RL algorithm calls at the beginning of every episode.
Step 13: Implement step()
The step() function is the core of the environment. It takes an action and returns the next state, reward, and termination signal.
def step(self, action):
    if self.state in self.terminal_states:
        return self.state, 0.0, True, False, {}

    r, c = self.state2grid[self.state]
    nr, nc = self.action_defs[action](r, c)
    next_state = self.grid2state[(nr, nc)]

    terminated = next_state in self.terminal_states
    reward = (
        1.0 if next_state == self.gold_state
        else -1.0 if next_state in self.trap_states
        else 0.0
    )

    self.state = next_state

    if self.render_mode == "human":
        self.render()

    return self.state, reward, terminated, False, {}
Let’s break that down:
- If the current state is already terminal, the episode is over.
- We convert the state to a grid position.
- We apply the selected action.
- We convert the new position back into a state index.
- We compute the reward.
- We update the internal state.
- We render the frame if needed.
- We return the full Gymnasium step tuple.
The reward design is straightforward:
+1for the goal,-1for traps,0for normal moves.
That reward structure gives the agent a clear objective while still leaving it room to explore.
Step 14: Add the Rendering Logic
Rendering is what makes GridWorld easy to understand visually.
def render(self):
    if self.window is None:
        pygame.init()
        self.window = pygame.display.set_mode(
            ((self.num_cols + 2) * CELL_SIZE,
             (self.num_rows + 2) * CELL_SIZE)
        )
        self.clock = pygame.time.Clock()
The window is created only once. After that, the same window is reused every frame.
We also handle the quit event so the window can be closed properly:
for event in pygame.event.get():
    if event.type == pygame.QUIT:
        pygame.quit()
        raise SystemExit
Then we clear the screen and draw the grid lines:
self.window.fill((255, 255, 255))

for c in range(self.num_cols + 1):
    pygame.draw.line(
        self.window, (0, 0, 0),
        ((c + 1) * CELL_SIZE, CELL_SIZE),
        ((c + 1) * CELL_SIZE, (self.num_rows + 1) * CELL_SIZE)
    )

for r in range(self.num_rows + 1):
    pygame.draw.line(
        self.window, (0, 0, 0),
        (CELL_SIZE, (r + 1) * CELL_SIZE),
        ((self.num_cols + 1) * CELL_SIZE, (r + 1) * CELL_SIZE)
    )
Now we draw the traps:
for r, c in self.trap_cells:
    pygame.draw.circle(
        self.window, (50, 50, 50),
        ((c + 1.5) * CELL_SIZE, (r + 1.5) * CELL_SIZE),
        CELL_SIZE // 3
    )
Then the gold cell:
gr, gc = self.gold_cell
pygame.draw.polygon(
    self.window, (230, 180, 50),
    [
        ((gc + 1.5) * CELL_SIZE, (gr + 1.2) * CELL_SIZE),
        ((gc + 1.8) * CELL_SIZE, (gr + 1.8) * CELL_SIZE),
        ((gc + 1.2) * CELL_SIZE, (gr + 1.8) * CELL_SIZE),
    ]
)
Finally, we draw the agent as a blue square:
ar, ac = self.state2grid[self.state]
pygame.draw.rect(
    self.window, (100, 100, 220),
    pygame.Rect(
        (ac + 1.2) * CELL_SIZE,
        (ar + 1.2) * CELL_SIZE,
        CELL_SIZE * 0.6,
        CELL_SIZE * 0.6
    )
)
At the end of the render step, we update the display and pause briefly:
pygame.display.flip()
self.clock.tick(self.metadata["render_fps"])
time.sleep(self.delay)
Step 15: Test the Environment
A good environment should be easy to run and inspect manually.
if __name__ == "__main__":
    env = GridWorldEnv(5, 6, render_mode="human")

    for _ in range(1):
        state, _ = env.reset()
        env.render()

        while True:
            action = env.action_space.sample()

            state, reward, terminated, truncated, info = env.step(action)

            print(
                "Action",
                state,
                action,
                "-> reward:",
                reward,
                "terminated:",
                terminated
            )

            env.render()

            if terminated or truncated:
                break

    env.close()
This simple loop samples random actions and helps us verify that:
- the agent moves correctly,
- the reward logic works,
- terminal states end the episode,
- rendering works as expected.
Why This Environment Matters
This GridWorld is tiny, but it contains the essential pieces of Reinforcement Learning:
- an agent,
- an environment,
- states,
- actions,
- rewards,
- terminal states.
That is exactly why it is such a useful first environment. Once you understand GridWorld, it becomes much easier to understand larger problems like CartPole, MountainCar, or more advanced control tasks.
Closing Thoughts
We have now built a complete GridWorld environment from scratch. Even though it is small, it captures the core RL loop: the agent observes a state, takes an action, receives a reward, and learns through interaction.
In the next part, we can use this environment to train an agent with Q-learning, SARSA, or another tabular method and see how learning actually happens.